Set up a CI/CD pipeline for your model
Table of contents
This guide will show you how to set up continuous integration and deployment for your Cog model, so you can safely and easily publish new versions of your model as part of your GitHub-based development workflow.

What is CI/CD?
CI/CD stands for continuous integration and deployment. It's a well-known process for building, testing, and deploying software. It has been a popular practice in the software industry for a long time, but it's just as applicable when developing machine learning models. After all, AI models are just software.
CI/CD has many benefits:
- Catch errors early. This helps reduce the risk of breaking things for your users.
- Test your model in a consistent and repeatable way.
- Automate the release process so you can ship new versions of your model more frequently.
- Collaborate with others. CI/CD workflows live as code in your repository, so they're easy to discover and understand.
What are we building?
In this guide, you'll set up a CI/CD pipeline for your Cog model using GitHub Actions and github.com/replicate/cog-safe-push, an open-source project we use internally at Replicate to test and deploy our production models.
Your pipeline will:
- Lint your Python model code.
- Create a private test model on Replicate.
- Push your local Cog model to the test model on Replicate.
- Lint the model schema, making sure all inputs have descriptions, etc.
- Run predictions against the test model and compare the outputs to the upstream model.
- "Fuzz" the test model for five minutes by throwing a bunch of different inputs at it and making sure it doesn't throw any errors.
- Push your changes to the production model once the test model passes all the tests.
What is fuzz testing?
Fuzz testing is a technique for finding bugs in software by passing invalid, unexpected, or random data as inputs to the software and seeing if it crashes. In this guide, we'll use Anthropic's Claude API to generate random inputs to test your model.
Language models are great for generating plain text, but they can also be used to generate JSON data. We'll take advantage of that here to generate structured data that matches the input schema of your model.
Prerequisites
Before starting this guide, you'll need the following:
- An existing Cog model. If you've never pushed a Cog model before, check out the guide to pushing your first model.
- A Replicate account for publishing your Cog model.
- A GitHub repository containing the source code for your model.
- An Anthropic account for generating JSON data to test your model.
Step 1: Create a GitHub Actions workflow
GitHub Actions is a feature built into GitHub that makes it easy to add scripts to your repository, and run those scripts on GitHub's servers. You can use GitHub Actions to do all kinds of automation, like running tests, deploying your model, and more.
To use GitHub Actions, you define workflows using YAML files stored in the .github/workflows directory of your GitHub repository.
Create a new file in your repository called .github/workflows/cog-safe-push.yml.
Then paste the following code into the file:
name: Cog Safe Push

on:
  workflow_dispatch:
    inputs:
      model:
        description: 'The name of the model to push, in the format owner/model-name'
        type: string

jobs:
  cog-safe-push:
    # Tip: Create custom runners in your GitHub organization for faster builds
    runs-on: ubuntu-latest

    steps:
    - uses: actions/checkout@v3

    - name: Set up Python
      uses: actions/setup-python@v4
      with:
        python-version: "3.12"

    - name: Install Cog
      run: |
        sudo curl -o /usr/local/bin/cog -L https://github.com/replicate/cog/releases/latest/download/cog_`uname -s`_`uname -m`
        sudo chmod +x /usr/local/bin/cog

    - name: cog login
      run: |
        echo ${{ secrets.COG_TOKEN }} | cog login --token-stdin

    - name: Install cog-safe-push
      run: |
        pip install git+https://github.com/replicate/cog-safe-push.git

    - name: Push selected models
      env:
        ANTHROPIC_API_KEY: ${{ secrets.ANTHROPIC_API_KEY }}
        REPLICATE_API_TOKEN: ${{ secrets.REPLICATE_API_TOKEN }}
      run: |
        cog-safe-push ${{ inputs.model }}
Commit this file to your Git repository and push it to GitHub.
Step 2: Set a Replicate API token
Before you can run your GitHub Actions workflow, you'll need to set a Replicate API token as a secret in your GitHub repository.
- Go to replicate.com/account/api-tokens
- Create a new token with a name like "GitHub Actions CI/CD workflow for my-username/my-model".
- Copy the token to your clipboard.
- In your GitHub repository, go to the Settings, click Secrets and variables, then click Actions.
- Click New repository secret.
- In the Name field, enter
REPLICATE_API_TOKEN. - In the Value field, paste the token you copied from Replicate.
- Click Add secret.
Step 3: Set a Cog API token
You'll also need to set a Cog API token as a secret in your GitHub repository, so the cog-safe-push script can push your model to Replicate.
- Go to replicate.com/auth/token and copy your CLI auth token.
- In your GitHub repository, go to the Settings, click Secrets and variables, then click Actions.
- Click New repository secret.
- In the Name field, enter
COG_TOKEN. - In the Value field, paste the token you copied from Replicate.
- Click Add secret.
Step 4: Set an Anthropic API key
You'll also need to set an Anthropic API key as a secret in your GitHub repository, so the cog-safe-push script can generate structured JSON inputs to test your model.
- Go to console.anthropic.com/settings/keys
- Create a new API key with a name like "fuzz testing with cog-safe-push for my-username/my-model".
- Copy the key to your clipboard.
- In your GitHub repository, go to the Settings, click Secrets and variables, then click Actions.
- Click New repository secret.
- In the Name field, enter
ANTHROPIC_API_KEY. - In the Value field, paste the key you copied from Anthropic.
- Click Add secret.
Step 5: Run the workflow
Now that you've created your workflow and configured the necessary secrets, you can run the workflow manually.
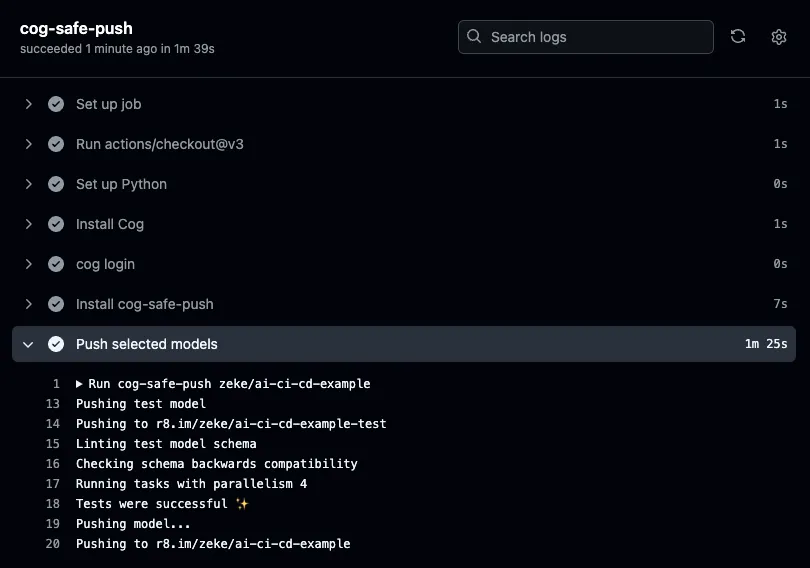
If you've configured your workflow correctly, you should see a green checkmark next to the workflow run, and output like the following:
- In your GitHub repository, go to the Actions tab.
- Click Cog Safe Push.
- In the Model field, enter the name of your model in the format
owner/model-name. - Click Run workflow.
🎉 Success! You've just run your CI/CD pipeline. If all the steps passed, you've now got a newly published version of your model on Replicate.
Step 6 (Optional): Customize cog-safe-push
The cog-safe-push command has sensible defaults and will work without any specific configuration, but you'll probably want to customize it to your needs.
If you create a file named cog-safe-push.yaml in your Cog directory, it will be used automatically.
Here's an example configuration that specifies a model, a test model, hardware, and a set of test cases:
# This is the model that the deployment will use
model: owner/my-model

# A private model to run the test against before pushing
test_model: owner/my-model-test
test_hardware: gpu-l40s

# Define the predict section to run predictions against the test model
predict:
  compare_outputs: false
  predict_timeout: 700
  test_cases:
    - inputs:
        prompt: A formula one car
        seed: 1
    - inputs:
        prompt: A cat
        duration: 4
        negative_prompt: Ginger cat
        frame_image_url: https://tjzk.replicate.delivery/models_models_featured_image/afce5fa4-5f8a-45db-95c0-bf62ec6958e7/output-59.webp
        seed: 2
To learn more about the available options, see the cog-safe-push README.
Next steps
Now that you have a CI/CD pipeline for your Cog model, you can use it to publish new versions of your model as part of your GitHub-based development workflow.
The Actions workflow you created is triggered manually. This is a good starting point, as it lets you run the workflow repeatedly until you get everything working the way you want.
Once you've got things configured just right, consider updating the workflow to run automatically when you push to a branch of your repository, or whenever you open a pull request.
Remember that CI/CD is an iterative process, and you'll need to customize the workflow and testing parameters to match your needs. The investment is worth it though: CI/CD will help you ship new versions of your model more frequently, and your team will enjoy faster development velocity and fewer operational headaches. Ship it! 🚀